Clustering Quartz Jobs

I was looking for a scale-out option with scheduling jobs and having used quartz previously, found that it is pretty easy to get clustering up and running pretty easily. The only caveat being that it is possible only with JDBC job store. The sample I tried with was a straight-forward job that just prints the time and the scheduler which has triggered it.

Sample Job:

import org.quartz.*;

@PersistJobDataAfterExecution
public class PrintJob implements Job {

   public void execute(JobExecutionContext jobExecutionContext) throws JobExecutionException {
      try {
         System.out.println("Print : "+System.currentTimeMillis()+" , "+jobExecutionContext.getScheduler().getSchedulerInstanceId());
      } catch (SchedulerException e) {
         e.printStackTrace();
      }
   }
}

Sample Trigger:

import org.quartz.*;
import org.quartz.impl.StdSchedulerFactory;

import java.io.*;
import java.util.Properties;

import static org.quartz.JobBuilder.newJob;
import static org.quartz.SimpleScheduleBuilder.simpleSchedule;

public class PrintScheduler {

	private Scheduler scheduler;
	public PrintScheduler(String instanceId) {
		try {
			Properties properties = loadProperties();
			properties.put("org.quartz.scheduler.instanceId",instanceId);
			scheduler = new StdSchedulerFactory(properties).getScheduler();
			scheduler.start();
		} catch (Exception e) {
			e.printStackTrace();
		}
	}

	private Properties loadProperties() throws FileNotFoundException,IOException {
		Properties properties = new Properties();
		try (InputStream fis = PrintScheduler.class.getResourceAsStream("quartz.properties")) {
			properties.load(fis);
		}
		return properties;
	}

	public void schedule() throws SchedulerException {
		JobDetail job = newJob(PrintJob.class).withIdentity("printjob", "printjobgroup").build();
		Trigger trigger = TriggerBuilder.newTrigger().withIdentity("printTrigger", "printtriggergroup")
				.startNow().withSchedule(simpleSchedule().withIntervalInMilliseconds(100l).repeatForever()).build();
		scheduler.scheduleJob(job, trigger);
	}

	public void stopScheduler() throws SchedulerException {
		scheduler.shutdown();
	}

	public static void main(String[] args) {
		PrintScheduler printScheduler = new PrintScheduler(args[0]);
		try {
//			printScheduler.schedule();
			Thread.sleep(60000l);
			printScheduler.stopScheduler();
		} catch (Exception e) {
			e.printStackTrace();
		}
	}

}

Please note, I have used quartz 2.x for this example.

On the configuration side, more-or-less it remains the same as for single node with couple of exceptions –

org.quartz.scheduler.instanceName = PRINT_SCHEDULER1
org.quartz.threadPool.class = org.quartz.simpl.SimpleThreadPool
org.quartz.threadPool.threadCount = 4
org.quartz.threadPool.threadsInheritContextClassLoaderOfInitializingThread = true

#specify the jobstore used
org.quartz.jobStore.class = org.quartz.impl.jdbcjobstore.JobStoreTX
org.quartz.jobStore.driverDelegateClass = org.quartz.impl.jdbcjobstore.StdJDBCDelegate
org.quartz.jobStore.useProperties = false

#The datasource for the jobstore that is to be used
org.quartz.jobStore.dataSource = myDS

#quartz table prefixes in the database
org.quartz.jobStore.tablePrefix = qrtz_
org.quartz.jobStore.misfireThreshold = 60000
org.quartz.jobStore.isClustered = true
org.quartz.scheduler.instanceId = PRINT_SCHEDULER1

#The details of the datasource specified previously
org.quartz.dataSource.myDS.driver = com.mysql.jdbc.Driver
org.quartz.dataSource.myDS.URL = jdbc:mysql://localhost:3307/blog_test
org.quartz.dataSource.myDS.user = root
org.quartz.dataSource.myDS.password = root
org.quartz.dataSource.myDS.maxConnections = 20<span id="mce_SELREST_start" style="overflow:hidden;line-height:0;"></span>

The configurations that are cluster specific here are –  org.quartz.jobStore.isClustered and org.quartz.scheduler.instanceId. In case of a single node instance, org.quartz.jobStore.isClustered is marked as false. In case of a cluster setup, it is changed to true. The second property that needs to be changed is on the instanceId which is like a name/ID used to uniquely identify the scheduler instance in the cluster. This property can be marked as AUTO in which case, each scheduler instance will be automatically assigned with a unique value, or you can choose to provide a value on your own (which I find useful since it helps me identify where the job is running). But, please note that the uniqueness is still to be maintained.

One of the requirement for this to work is to have time sync between the nodes running the scheduler instances or there might be issues with the schedule. Also, there is no guarantee that there will be equal load distribution amongst the nodes with clustering. As per the documentation, quartz ideally prefers to run the job on the same node in case it is not currently on load.

Code @ https://github.com/vageeshhoskere/blog/tree/master/quartz
Multinode cluster setup in Hadoop 2.x

It’s been quite some time since I wanted to join the distributed processing bandwagon and finally got my lazy self to actually do something about it and started investing some time to learn and experiment with few technologies – some old, some not so old and some new – the first of which was Hadoop..

So naturally, the next step was to setup Hadoop in a cluster setup… The setup process, contrary to any misgivings that I may have had, was quite simple and straight forward and all that needed to be done was follow a series of steps –

  •  First off, choosing the cluster configuration – I decided to use a cluster with one name-node/resource manager and 3 other data-nodes/node managers. For simplicity, let’s call them as hadoopmasternode and hadoopdatanode1, hadoopdatanode2 and hadoopdatanode3
  • Once I had all 4 RHEL systems in place, second step was to download the latest stable release of Hadoop 2.x – which happened to be 2.6 during the writing of this post… The downloaded tar.gz archive was extracted to the /opt/hadoop folder
  • Hadoop also needs JDK to be present, which can easily be downloaded from the Oracle Java download site, which in my case happened to be JDK8
  • Next update /etc/hosts file on all the systems to include all the cluster nodes
  • It is better to have a separate user for using hadoop – So create a new user using the commands “useradd -U -m hadoopuser” and “usermod -g root hadoopuser”
  • Now that the hadoop user is created, it is time to make this user the owner of hadoop files – “chown -R hadoopuser:hadoopuser /opt/hadoop”
  • Login as hadoopuser (“su – hadoopuser”) and edit/update the hadoop environment variables for hadoopuser
    • The bash shell needs to be updated with the hadoop variables for which we would need to edit ~/.bashrc (“vi ~/.bashrc”) and append the file with below updates

      export JAVA_HOME=<JAVA_HOME>( ex. /usr/java/jdk1.8.0_40/)
      export HADOOP_HOME=/opt/hadoop
      export HADOOP_CONF_DIR=/opt/hadoop/etc/hadoop
      export PATH=$PATH:$HADOOP_HOME/bin
      export PATH=$PATH:$HADOOP_HOME/sbin
      export YARN_HOME=$HADOOP_HOME
      export HADOOP_COMMON_LIB_NATIVE_DIR=$HADOOP_HOME/lib/native
      export HADOOP_OPTS="-Djava.library.path=$HADOOP_HOME/lib"
      
    • Next is to update the JAVA_HOME variable with the path to Java install location in hadoop settings file hadoop-env.sh under /opt/hadoop/etc/hadoop folder…
  • Once the settings are updated, the same needs to be sourced by running the command “source ~/.bashrc”
  • Now that the hadoop environment settings are updated, the next step is to update the hadoop and yarn settings/configuration for the cluster which are basically a bunch of XML files present in $HADOOP_HOME/etc/hadoop folder
    • First is to edit the core-site.xml and provide the namenode details –

      <property>
         <name>fs.defaultFS</name>
         <value>hdfs://hadoopmasternode:9000</value>
      </property>
      
    • Next, update yarn-site.xml file with Yarn specific configurations –

                <property>
                         <name>yarn.nodemanager.aux-services</name>
                           <value>mapreduce_shuffle</value>
                </property>
                <property>
                           <name>yarn.nodemanager.aux-services.mapreduce.shuffle.class</name>
                           <value> org.apache.hadoop.mapred.ShuffleHandler</value>
                </property>
                <property>
                            <name>yarn.resourcemanager.resource-tracker.address</name>
                            <value>hadoopmasternode:9010</value>
                </property>
                <property>
                          <name>yarn.resourcemanager.scheduler.address</name>
                           <value>hadoopmasternode:9020</value>
                </property>
                <property>
                          <name>yarn.resourcemanager.address</name>
                           <value>hadoopmasternode:9030</value>
                </property>
      
    • Copy mapred-site.xml.template file as mapred-site.xml and then mark Yarn as the mapreduce framework by adding following properties to mapred-site.xml file

                <property>
                          <name>mapreduce.framework.name</name>
                           <value>yarn</value>
                </property>
                <property>
                          <name>mapred.job.tracker</name>
                           <value>hadoopmasternode:9040</value>
                </property>
      
  • Please note, these steps need to replicated on all the nodes of the cluster
  • Once all the nodes are made ready create the namenode folder in hadoopmasternode –
    • Run command “mkdir -p /opt/hadoop/hdfs_data/namenode” to create the namenode directory
    • Update hadoop configuration files to indicate the namenode folder and the number of data nodes by editing the $HADOOP_HOME/etc/hadoop/hdfs-site.xml file and including the below properties –

                <property>
                          <name>dfs.replication</name>
                           <value>3</value>
                </property>
                <property>
                          <name>dfs.namenode.name.dir</name>
                          <value>file:/opt/hadoop/hdfs_data/namenode</value>
                </property>
      
  • Next on the hadoopmasternode, mark the master and slave node details one-per-line in $HADOOP_HOME/etc/hadoop/masters and $HADOOP_HOME/etc/hadoop/slaves files (Make sure you create the file if it does not exist…) respectively.
  • Hadoop needs needs to be able to communicate from the masternode to the data nodes via SSH without being asked for password authentication. In order to achieve this, the data nodes needs to have the namenode added to its authorized keys… This can be done by the following steps –
    • Use command “ssh-keygen -t rsa -P “” -f ~/.ssh/id_rsa” to generate a key
    • Add this key to the list of authorized keys by running “cat ~/.ssh/id_rsa.pub >> ~/.ssh/authorized_keys”
    • Run the command “ssh-copy-id -i ~/.ssh/id_rsa.pub hadoopuser@hadoopdatanode1” , “ssh-copy-id -i ~/.ssh/id_rsa.pub hadoopuser@hadoopdatanode2” and “ssh-copy-id -i ~/.ssh/id_rsa.pub hadoopuser@hadoopdatanode3” to ensure that communication between hadoopmasternode and all three data nodes is authorized
  • Next, on each of the data node, create the datanode folder – “mkdir –p $HADOOP_HOME/hdfs_data/datanode” and update the hadoop configuration to point to the created folder by editing the $HADOOP_HOME/etc/hadoop/hdfs-site.xml and adding the following properties –
    • <property>
                <name>dfs.replication</name>
                <value>3</value>
      </property>
      <property>
                <name>dfs.datanode.name.dir</name>
                <value>file:/opt/hadoop/hdfs_data/datanode</value>
      </property>
      
  • Once all the datanodes are ready, switch back to the hadoopmasternode and format the hdfs file system by running the command “$HADOOP_HOME/bin/hdfs namenode -format –clusterId HADOOP_CLUSTER” which will create a cluster called HADOOP_CLUSTER
  • Once the cluster is formatted, start the hdfs filesystem and the yarn resource manager by running the commands “$HADOOP_HOME/sbin/start-dfs.sh” and “$HADOOP_HOME/sbin/start-yarn.sh” respectively
  • After the services are started, cluster health can be checked @ http://hadoopmasternode:50070/dfshealth.html#tab-overview

At any point, in-case there is a need to shut down the resourcemanager and filesystem, run the scripts $HADOOP_HOME/sbin/stop-yarn.sh and $HADOOP_HOME/sbin/stop-dfs.sh respectively.

Now the hadoop cluster is ready for use…

Commenting XML content using Java

SAX parser can be used to add new comments or comment current content from an xml. JDOM gives an element called comment that can be used to create and write comments to a file. The below sample program details the way to comment out content from XML file.

Sample XML:

<?xml version="1.0" encoding="UTF-8"?>
<bookbank>
	<book type="fiction" available="yes">
		<name>Book1</name>
		<author>Author1</author>
		<price>Rs.100</price>
	</book>
	<book type="novel" available="no">
		<name>Book2</name>
		<author>Author2</author>
		<price>Rs.200</price>
	</book>
	<book type="biography" available="yes">
		<name>Book3</name>
		<author>Author3</author>
		<price>Rs.300</price>
	</book>
</bookbank>

Sample Program:


package blog.sample.code;

import java.io.FileWriter;
import java.io.StringWriter;
import java.util.ArrayList;
import java.util.Iterator;
import java.util.List;

import org.jdom.Comment;
import org.jdom.Document;
import org.jdom.Element;
import org.jdom.input.SAXBuilder;
import org.jdom.output.XMLOutputter;

public class XMLCommentTest {

   public XMLCommentTest() throws Exception{
      String outputFile = "C:\\blog\\sample.xml";
      SAXBuilder builder = new SAXBuilder();
      Document document = builder.build(outputFile);
      Element root = document.getRootElement();
      List list = root.getChildren("book");
      List newList = new ArrayList();
      Iterator itr = list.iterator();
      while(itr.hasNext()){
      Element ele = itr.next();
         if(ele.getAttributeValue("type").equalsIgnoreCase("biography")){
            java.io.StringWriter sw = new StringWriter();
            XMLOutputter xmlOutput = new XMLOutputter();
            xmlOutput.output(ele, sw);
            Comment comment = new Comment(sw.toString());
            itr.remove();
            newList.add(comment);
         }
      }
      for(Comment com : newList){
         root.addContent(com);
      }
      document.setRootElement(root);
      XMLOutputter xmlOutput = new XMLOutputter();
      //xmlOutput.output(document, System.out);
      xmlOutput.output(document, new FileWriter(outputFile));
   }

   public static void main(String[] args) {
      try {
         new XMLCommentTest();
      } catch (Exception e) {
         e.printStackTrace();
      }
   }

}

The output of the above program is the updated sample.xml with the below content:

<?xml version="1.0" encoding="UTF-8"?>
<bookbank>
	<book type="fiction" available="yes">
		<name>Book1</name>
		<author>Author1</author>
		<price>Rs.100</price>
	</book>
	<book type="novel" available="no">
		<name>Book2</name>
		<author>Author2</author>
		<price>Rs.200</price>
	</book>
	<!-- <book type="biography" available="yes">
		<name>Book3</name>
		<author>Author3</author>
		<price>Rs.300</price>
	</book> -->
</bookbank>

==

Creating update site for Eclipse Plug-in

The eclipse plugin developed can be exported to be accessed via the update-site. This involves creating a Feature project for the plugin and uploading the same to a file (ftp)/web server, from where, the same can be accessed using a URL via the Eclipse plugin installer.
The first step involved in the procedure is to create a feature project for the plugin created.

  • Choose File -> New -> Plug-in Development -> Feature Project and click Next
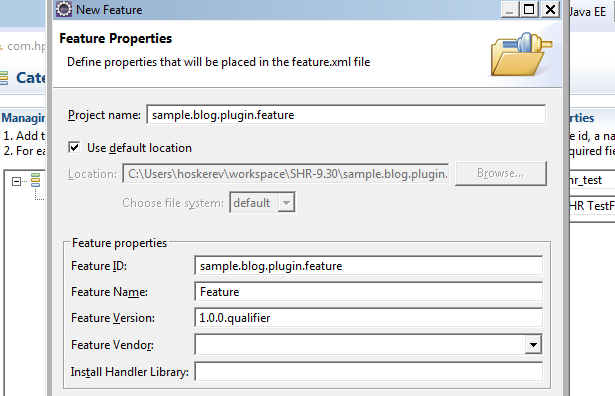
  • Enter the Name for the project and select Next1
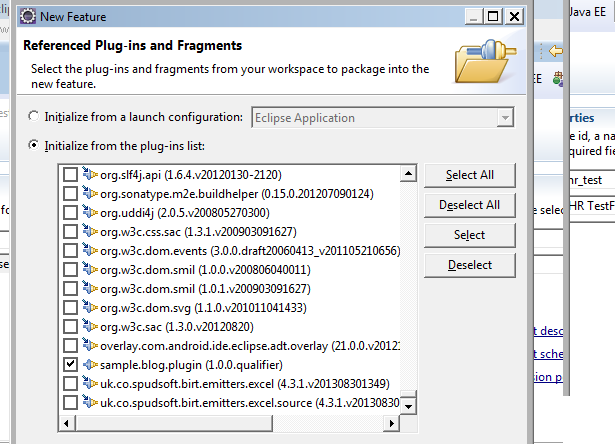
  • Once done, select the plugin that is to be bundled as a feature from the plug-ins list –2
  • Click on Finish to create the project
  • Next, a new update site project is to be created which will refer to the feature just created. Navigate to File -> New -> Plug-in development -> Update Site Project to create a new update site and then give the same a meaningful name.
  • In the site.xml file that opens up, click on “New Category” to create a category definition that will be added to the software repository
  • Provide a meaningful ID and name for the category and optionally also add description for the category
  • After creating the category, the feature must be linked to the same to ensure when installing the plug-in from the update site, the required feature will be listed under the category selected.2 (1)
  • In the Archives tab of the site.xml, provide information on the Name, URL and description of the FTP server where the plug-in is to be hosted
  • Now the update site is created. Next select the category and click on the “Build All” button to package the plugin. Once built, the package will be exported to the root folder of the current update site project itself
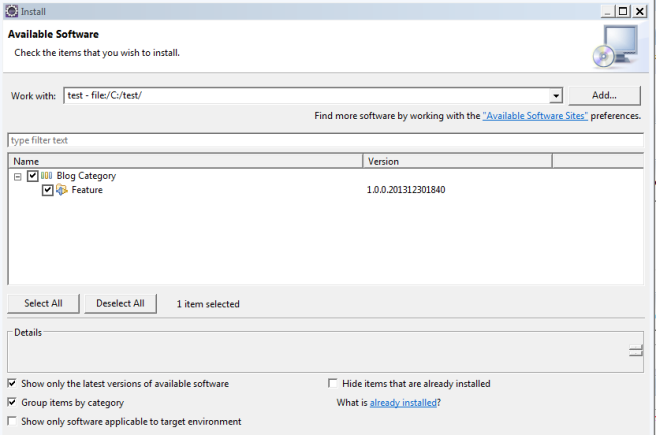
  • The plug-in is ready to be installed. Go to Help -> Install New Software to add the local site (project location from the previous step) to the repository and install the plugin.2 (2)
  • Restart Eclipse to use the plugin installed